01.jpg)
 I am about a week behind with these photos, so if you go into the shul you will see we are much farther along - but I wanted to share a few images of the first big part of the work, which was consolidating the flaking paint and removing the large areas of bright green overpaint.
 The paint layer - which is not just one paint layer, of course, but can consist of three or four or five different applications dating to different time periods - was detached, or delaminating, from the plaster wall in many places. The separation from the wall and the many losses did allow us to see that the plaster behind this painting is in good condition, which isn't true for many parts of the wall, as those of you who know the shul can attest!
 Our first big task was to readhere the flaking paint areas to the wall. This was time consuming but very successful and our method is detailed in an earlier post. If you look at the wall today, you will still see a network of cracks, but the paint flakes are now all lying relatively flat against the wall.
Our second simultaneous task was to remove the bright green overpaint areas. This green paint represents what seems to be the most recent effort to cover the damaged areas. There have also been at least two layers of spackle applied over the damaged areas, which extend, in many cases, quite far outside the missing areas, covering lots of original surface. We have carefully removed as much of this as we can and have revealed large portions of the original painting, in good condition. Luckily the spackle cleaves easily from the paint layer and is soluble in water, though it takes a bit of work to remove all the traces from the irregular topography of the surface. We are not as lucky with the green paint, as it leaves a greenish residue which is difficult to remove without also affecting the original surface underneath, and tends to stay in the cracks and small depressions of the surface.
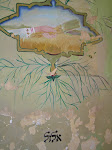
 Here we are with the bright green removed and the paint flattened. The two areas of green on the right are areas where we are keeping the old fill material in the losses; we will just inpaint it to match the surrounding area.
 Since this photo was taken, we have removed large areas of the dull brown overpaint that covers the lower half of the panel, and filled in most of the loss areas at the bottom with a tinted spackle that will cover only areas of loss, not original surface. We have also removed a large part of the overpaint from the scene itself and filled in the large and small losses there, which are now ready to be inpainted to match the surrounding colors. Please check back in a week or so for more photos!
No comments:
Post a Comment